Here is the continuation of our post on How to build a deck: The first steps. The Virtual Constructor gives you the composition of your beam, it’ll just require some assemble. On a flat surface on your property, place the pieces of 2”x10” or 2”x8” perfectly aligned one on top of the other. Place a screw at one end (do no drive the screw deep before everything is perfectly aligned)
How to make a perfect alignement?
It is possible that the pieces of 2”x10” are not perfectly straight from the start. So once attached at one end, go in the middle, realign it and drive another screw in the center. Now go to the opposite end and, with clips, reposition, if necessary, the pieces. Once completed, you can nail the pieces of 2”x10” together with two nails every 12 inches. Please note that it is strongly advised to use rust-resistant nails and fasteners for any deck project.
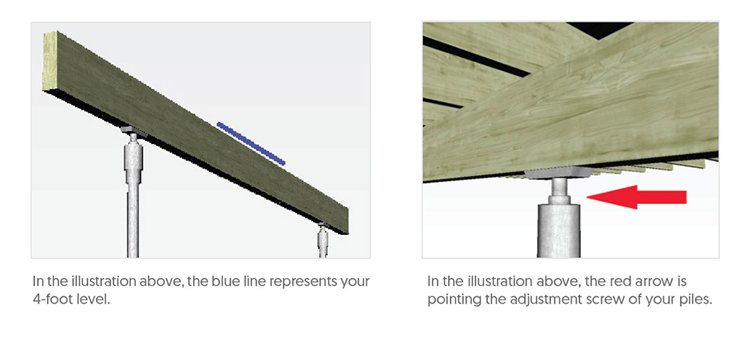
Now you can place the beam assembly on the piles. It should be perfectly positioned between the lines of your contour ropes (perpendicular to the house), previously placed using the 4 corners of your fictive deck's plan. To level the beam, repeat the same exercise done with the piles height, but this time with the beam to verify the exact final height. Place your 4-foot level on several spots to verify the beam’s position (see figure below). Please note, if there is a slight deviation in the beam, it is not a disaster! Place the center of the curve upward so that the weight of the deck will press down and help level it out.
 The Rimboard
To make the rimboard, you’ll reproduce the square (ropes and large nails previously installed)
with the first 2 outline joists. You will need : 2 rimboards of 2”x8” , and 2 joists of 2”x8” every 16”. Install all hangers on the first rimboard of 2x8 to be fixed to the side of your home. Do this
in a place where you will be comfortable to measure (16” center/center), screw and nail at each bracket.
How to measure without making any mistakes?
The trick to make a good measure is to fix your measuring tape at the end of the rimboard
of 2”x8” and then to draw the lines, centered every 16 inches: Calculate 16 inches, then 16+16=32 inches, then 16+16+16=48 inches, and so on (16’’, 32’’, 48’’, 64’’, 80’’, 96’’, 112’’, 128’’, 144’’, etc.). Most of the times, tapes are already marked every 16 inches.
Now that your brackets are installed, attach the first rimboard of 2”x8” to the side of your home. Put it straight, using only one screw at each end in order to adjust, if necessary, before you take the next step. Once square, this joist’s rimboard must be firmly attached to the house. The Virtual Constructor calculates anchors of ½ inch diameter every 12 inches with at least 3 inches of penetration in your house’s material. (Either it’s concrete or wood, make sure that everything can support heavy loads and a group of adults in movement. If your home’s rimboard is not strong enough, you will need to reinforce it before fixing the deck’s rimboard). Always be careful to not damage pipes, electrical wirings and other components when drilling into the existing rimboard.
Both sides’ joists
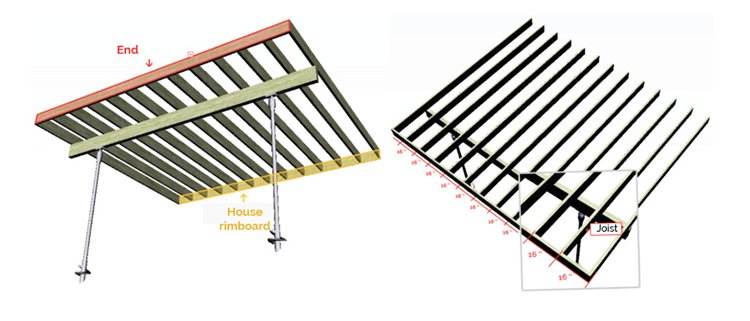
Install the first two joists (those will be 16’’c/c). So the first and last one (see red arrow in the illustration), will be perpendicular to the house, according to your ropes. Remake your square line (from the first steps) so that everything is precise. Now that everything is right and square, fix both joists on the beam, so that nothing moves. Install the other 2”x8” rimboard to the end of the joist (on this side of 2x8, reproduce the same steps as for the 2”x”8 rimboard secured against the house without using hangers (just markings). Follow this order again: 16’’, 32’’, 48’’, 64’’, and so on with increments of 16”).
A FREE ONLINE APP TO ASSIST YOU
Use the Virtual Constructor
online application to estimate and calculate all the necessary building materials. You can evaluate the quantity of materials and order them online. Download the
complete step by step guide to deck building.
In the next blog, we’ll discuss the how-to’s of Joists installation.
It’s hammer time!!